Mar 18, 2012 - Unable to write inside TEMP environment variable path

Comments

I stumbled upon this beautiful error when trying to re-install my PostgreSQL 9.1.3 server: Unable to write inside TEMP environment variable path.

After some research and trial-and-terror [sic], I came to the conclusion that the essence of the problem had been a tiny change I made to my system's file associations (via Notepad++).

Here's how I solved it and how you can do it too:


I first made some research in the existing community but the solutions I found did not apply to me (I provide some links at the end of the page to these solutions):
  • I checked if it was related to the option "Use temporary folders per session" in the "Remote Desktop Session Host Configuration";
  • I checked the status of "Windows Script Host Settings" (whost.exe);
  • I completely skipped antivirus-related stuff as I don't have any antivirus.

So, to understand why this error was happening, I went to my TEMP folder and read the log from the PostgreSQL installer:

C:\Users\myuser\AppData\Local\Temp\bitrock_installer.log

Which mentioned an interesting detail:
  • Input Error: There is no script engine for file extension ".vbs".
So, I picked up another file from the TEMP folder, the actual script used by the installer:

C:\Users\myuser\AppData\Local\Temp\prerun_checks.vbs

And tried to run it through the console using cscript:

Input Error: There is no script engine for file extension ".vbs".

The same!
I researched a bit more and discovered that the type of file associated with the vbs extension had been changed. In my case, by Notepad++. After I installed Notepad++, I associated some file extensions with it (including vbs), thus causing problems when detecting the type of the script (which shouldn't happen).


Fixing it


Run the almighty regedit, navigate to HKEY_CLASSES_ROOT\.vbs and change the (Default) key back to the string VBSFile. In my case it had been previously altered to Notepad++_file.

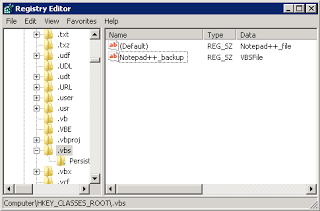
How the registry entries looked like before


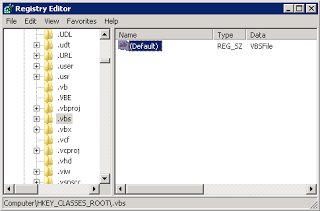
How the registry entries look when fixed

Then, restart PostgreSQL's installer and everything should go fine.


This is just a possible pair of cause-solution. Other solutions can be reached via some of the links below, don't forget to check them if my post doesn't apply to your issue.


Useful links:
Input Error: There is no script engine for file extension “.vbs”.
Running VBScript and JScript files from the Command Shell
Temporary directory environment variable in Windows Server 2008
Running & Installing PostgreSQL On Native Windows
Collect the installer log file (PostgreSQL)
Unable to write inside TEMP environment path

Mar 16, 2012 - Running GlassFish as a service on Windows (Error 1067)

Comments

I've been trying to run GlassFish as a service on Windows:

asadmin.bat create-service

Unfortunately, that task didn't show up easy due to one little detail: GlassFish was installed on the famous Program Files folder. Other causes may just need a restart of Windows.

When starting the service, it says: Error 1067: The process terminated unexpectedly. And it really terminates.


Because there is a space character between Program and Files, the path to GlassFish also has spaces. The way GlassFish is called when requested via the service start makes it impossible to resolve the path correctly if there are spaces and other special characters, on Windows.

First of all, make sure you restarted your Windows after installing GlassFish as a service. I also had this problem when not using spaces in the path. After restarting the system, everything got fixed by itself.


Update: The following content, in a gray font, is composed of some workarounds for solving this problem. These workarounds are not required anymore because Byron Nevins just found out the right fix for this problem. Skip to the Solution.


I will not present the perfect solution, but some possible workarounds for this, although I encourage you to share your experiences below in the comments:

1.Just move your whole GlassFish installation to a directory with no spaces behind. It'll just work, no issues.

2.If you really want GlassFish to live in your old directory, you can create a symbolic link to that directory and put it in a legal path.
mklink /d C:\glassfish-3.1.2 C:\"Program Files"\glassfish-3.1.2
Now, create the service using the usual method and still at the old path:
asadmin.bat create-service
And edit the file C:\Program Files\glassfish-3.1.2\glassfish\domains\domain1\bin\domain1Service.xml (assuming base path is C:\Program Files):

  • Remove every occurrence of: Program Files\\ or Program Files/, thus making the service executable point to your new symbolic link.

3.Create a service by hand, using sc (don't forget the space before the equal signs):

sc create MyGlassFishServiceName binPath= "C:\Program Files\glassfish-3.1.2\bin\asadmin.bat start-domain domain1" start= auto
This will create a service based on the usual GlassFish administration script, asadmin, so it's not a clean way and some errors may be thrown when manually starting the service. Also, it cannot be stopped. If you just want GlassFish to run as a service at startup, then this probably fits you enough. Update: Thanks to the fellow follower Micael Capitão that pointed out some typos in my command.

The Perfect Way.By editing the file I mentioned above, domain1Service.xml, we should be able to escape the spaces from from the path (usual escaping doesn't seem to work). Also, that could come as default in future versions of the splendid Oracle GlassFish (and the open source edition too, for that matter). Oracle already knows of the problem, like one of the following links reveals. If anybody knows/discovers how this can be achieved, please post in the comments below.


Solution
  • After creating the service, edit the file:
     C:\Program Files\glassfish-3.1.2\glassfish\domains\domain1\bin\domain1Service.xml
    (assuming glassfish is installed at C:\Program Files\glassfish-3.1.2)

  • Find the line:
    <startargument>C:\\Program Files\\glassfish-3.1.2\\glassfish\\domains</startargument>

  • Add double quotes around the path, like this:
    <startargument>"C:\\Program Files\\glassfish-3.1.2\\glassfish\\domains"</startargument>

  • Do the same for the line:
    <stopargument>C:\\app\\big glass\\glassfish\\glassfish\\domains</stopargument>


Some useful links:
How do I run GlassFish as a Windows service? (Oracle)
How to create a Windows service by using Sc.exe (Microsoft)

Mar 15, 2012 - Change Jenkins or Hudson HTTP port number

Comments

One of the things server administrators of Jenkins or Hudson CI solutions often want to do, is to change the HTTP administration port.

I'll show you how, in 4 different ways: For Windows (service), WAR file deployed in GlassFish, Natively in linux and finally, using wrapper.

It's pretty simple:


For Windows (service installation)
Edit jenkins.xml or hudson.xml
Where is the jenkins.xml or hudson.xml?

Navigate to the directory where you installed Jenkins/Hudson and you will see the XML at the root. Open it and look for tag, there will be all the command arguments to be used when starting up Jenkins or Hudson.

One of those arguments is --httpPort, typically:
--httpPort=8080.
Change 8080 to whatever port number you want.


WAR File, deployed in GlassFish
You will need to change the default HTTP port in GlassFish.


Natively installed in linux
At least for RHEL, you should be able to find the /etc/sysconfig/hudson, which typically has the following line, among other configuration ones:
HUDSON_PORT="8080".
Change 8080 to whatever port number you want.


Other linux distributions (using wrapper)
At the time of writing, Arch Linux's AUR Jenkins version uses wrapper to launch itself from the .war file.

Edit /opt/jenkins/conf/wrapper.conf, find wrapper.app.parameter.2=--httpPort=8070 (typically).
Change 8070 to whatever port number you want.

This wrapper solution applies to any system using wrapper, not only linux.


Some useful links:
Forum talk about the Windows version
Configuration tutorial in RHEL

Feb 10, 2012 - Creating KDE's Dolphin services and integrating AES Crypt into it

Comments

The main objective of this post is to give you a quick glance at how you can create service menus and plugins for use under Dolphin, the default file manager in KDE.

In order to achieve the goal, you need to know what service you want to create for Dolphin. That's where I present you AES Crypt, a nice simple application that allows you to encrypt/decrypt your files in an easy and cross-platform way. Unfortunately, the linux version lacks some features, like UI integration (for obvious reasons), and it's up to us users to make something about it.


As such, I will show you how to integrate AES Crypt with one specific file manager you can use on Linux, KDE's Dolphin, as I mentioned before. That way, you'll be able to quickly call AES Crypt inside Dolphin, just like the Windows version, no need to pop out the terminal and type aescrypt -e or aescrypt -d everytime.

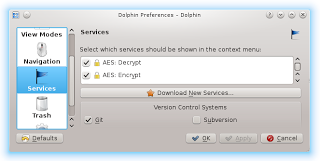
Dolphin Preferences, showing the AES service installed.


Let's start then:

Create the service file:

The whole service goes into just one file, and that is the one you will be creating. Create an empty text file and save it with the .desktop extension. The full name I used was aes.desktop.


Define the basic structure:

Like in any other .desktop file, you must define the desktop entry section. You start it with:

[Desktop Entry]

Inside this section, you will put the pairs of keys and values that will tell Dolphin what this .desktop file is all about. However, let's postpone that task for now.


Below the desktop entry line, add the following two lines, which define desktop actions:

[Desktop Action encrypt]

[Desktop Action decrypt]

The first line will tell Dolphin what to do when you ask it to encrypt a file, the second one will tell it what to do when you want to decrypt a file. You are free to name the actions as you wish. I named them encrypt and decrypt.

The basic structure is done. A desktop entry section and one desktop action section for each atomic thing you want to do. Now you just need to populate these sections with usefulness.

Populate the desktop entry:

Inside this section you will put the pairs of keys and values that will make the file recognizable as a Dolphin service as well as what actions does it offer. The way I'll show you will create an option with a submenu. The submenu will then let you encrypt or decrypt the file you have selected under Dolphin.

So, add the following lines:

Type=Service
This line tells that the desktop file describes a service.

X-KDE-ServiceTypes=KonqPopupMenu/Plugin
This one will make Dolphin know that it must show an option on the context menu with our service.

MimeType=all/all
We want the context menu to appear in all kinds of files, so we set the mime type to everything (all/all).

Icon=kgpg
What icon should our desktop file have. More importantly, what icon will appear in our option of the context menu. I used the kgpg icon that requires having kgpg installed.

Actions=encrypt;decrypt;
This key is crucial because it lists all the actions supported (semicolon separated). The names you gave to the desktop actions before must be the same as the ones you list in this line.

X-KDE-Submenu=AES
Finally, what should be the name of our context menu option? I named it just "AES".


Populate the desktop actions:

For each action you define, you will give a name, an icon (to show in the submenu option) and a command to execute (for calling AES Crypt). So, put the following pairs of keys next to the beginning of encrypt desktop action:

Name=Encrypt
Icon=kgpg
Here I call the encrypt action "Encrypt" and set the kgpg icon, just like the main context menu option.

Exec=aescrypt -e -p `kdialog --password "Insert desired password:" --title "AES Encryption"` "%f"
The key Exec is where all the magic happens. When the user selects "Encrypt" in the context menu submenu, the above command will automatically run. What it does is call AES Crypt on the file currently selected ("%f") and encrypt it with a password provided by KDialog. Using KDialog, you can quickly create simple window dialogs to show or input information. The KDialog I used will ask the user for a password, as shown in the picture below:
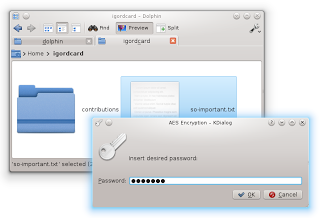

Now, for the second action (decrypt), it's pretty much the same:
Name=Decrypt
Icon=kgpg
Exec=aescrypt -d -p `kdialog --password "Provide required password:" --title "AES Decryption"` "%f"

Install the plugin:

Now that you have a full service written, it's time for Dolphin to make use of it. To accomplish that, you can either copy the file to ~/.kde4/share/kde4/services/ServiceMenus/ directory (create it if it doesn't exist) or to /usr/share/kde4/services/ServiceMenus/ (create it if it doesn't exist), assuming a typical installation of GNU/Linux. Remember that you should avoid messing with the global directories (like /usr) to maintain your system consistent with your package manager and to avoid sad lucks, so I recommend putting the file in your home. By the way, the tilde (~) represents you home directory.
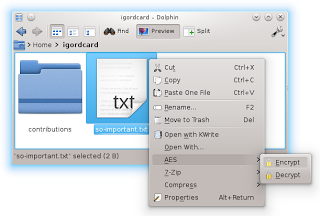
Give it a try:

Assuming that you have AES Crypt installed as well as KDE, you should now be able to fire up Dolphin, select a file, right click on it, select AES and finally select Encrypt. A KDialog will appear, input your password, and a new file will be created with the name of the non-encrypted plus the .aes extension. Check the contents of the file, you can't understand a thing! It's encrypted. Now go to the AES submenu again and select Decrypt. You will be asked for the password, type it and you will recover the file.


As you can see, creating a service plugin for Dolphin is pretty straightforward and can help ease and fasten some tasks that would be boring otherwise, especially daily ones.

Give AES Crypt a try as it works very flawlessly and is compatible both with Windows, Linux and Mac OS. You can easily secure and move your files from system to system (oh Android and iOS...).


You can download the whole service file: Here.


A few useful links:
AES Crypt
KonqPopupMenu
KDE Dialogs

Atualização em 2013/05/12:
Uma versão deste artigo em português pode agora ser consultada no website do Grupo de Linux da Universidade de Aveiro.

Jan 27, 2012 - Waiting for UDev events to be processed

Comments

A couple of days ago my netbook started taking too long to start up and giving me timeouts while processing events from UDev.
This happened during the boot auto-detection of devices in my distro of choice, Arch Linux.
I found out that it was related to my wireless adapter, Broadcom BCM4313 and a recent commit to udev.

I will present the issue encountered and a possible solution for it. I will especifically show how to do it under Arch Linux and, finally, I will leave you some useful links.


During the boot I ran into the following bunch of lines:
Loading User-specified Modules                   [DONE]
Waiting for UDev uevents to be processed         [BUSY]udevd[131]: worker [138] timeout, kill it

udevd[132]: seq 1077 '/devices/pci0000:00/0000:00:1c.0/0000:05:00:0' killed

udevd[132]: worker [139] terminated by signal 9 (Killed)
In addition, the boot time was severely hit because the Waiting for UDev uevents to be processed part would take too long and timeout.

In my journey to fix this issue, I first ran lspci to check which device was causing this failure and found out it was my Broadcom BCM4313 wireless adapter:
$ lspci -s 0000:05:00.0
05:00.0 Network controller: Broadcom Corporation BCM4313 802.11b/g/n Wireless LAN Controller (rev 01)

Then, I got the name of the module loaded for my card:
$ lspci -vin -s 0000:05:00.0
05:00.0 Class 0280: Device 14e4:4727 (rev 01)
        Subsystem: Device 185f:051a
        Flags: bus master, fast devsel, latency 0, IRQ 16
        Memory at f0100000 (64-bit, non-prefetchable) [size=16K]
        Capabilities: < access denied >
        Kernel driver in use: brcmsmac

Now that I knew the module name was "brcmsmac", I decided to add it to my /etc/rc.conf MODULES section, thus making the adapter already available before the udev detection process.

It worked and my boot time got reduced and more elegant.


If you are having the same problem, you should add the module to your boot init script (/etc/rc.conf is one of the ways in Arch Linux), or you can build a cpio kernel image with the module already bundled (but make sure to, somehow, add the required firmware drivers or it won't work because the initial ramfs can't access the root file system).

I have also researched about this problem and it seems to affect many cards as this was generally caused by a recent commit in UDev. So, the solution is easily portable to other devices and kernel modules, you just need to know what those are first (for instance using lspci and the device ID reported by the boot errors and matching them with a kernel module, like I did above).

Now, in more detail, how to fix this problem in Arch Linux with /etc/rc.conf:
  1. Make sure you know the name of the module that is failing detection during the boot, as I explained in the paragraph above;
  2. Under root, edit /etc/rc.conf;
  3. Find a line stating MODULES=(module1 module2 etc);
  4. Inside these brackets put the kernel module of your device/adapter (that you found using lspci -vin -s) , like: MODULES=(mymodule) or MODULES=(othermodule mymodule), if you already have other modules manually declared;
  5. In my case, I ended up with: MODULES=(brcmsmac acpi-cpufreq coretemp), where brcmsmac is the module of my Broadcom BCM4313, which comes with the linux kernel since version 2.6.39;
  6. When you have edited rc.conf, quit and save it, restart the computer and you should now have a proper clean startup.

To complete, I'm leaving you some related links:


Update of 2012/03/15:

Dec 26, 2011 - Creating a search plugin for Firefox

Comments

You have probably used multiple search engines with Firefox's OpenSearch plugins. Many websites currently advertise their own search engines using the Autodiscovery method supported by Firefox. You can either add their search engines or you can find some custom ones on Add-ons for Mozilla.

However, sometimes you just need something different, something that fits your specific needs and can't be found anywhere else. In those cases, the best is to do it yourself.


Some browsers, like Chromium, provide an easy way for manually creating search plugins right in the user interface, but with a clean installation of Firefox it isn't that simple.
So, how to create a simple Firefox search plugin without wasting much time investigating? I'm gonna give you a hand for that:

You will need to create a little XML file for each search engine you want to add.

Let's take a look at an example that uses Google Translate:

<SearchPlugin
xmlns="http://www.mozilla.org/2006/browser/search/"
xmlns:os="http://a9.com/-/spec/opensearch/1.1/">
<ShortName>Translate</ShortName>
<Description>Google Translate</Description>
<InputEncoding>UTF-8</InputEncoding>
<Image width="16" height="16">http://translate.google.com/favicon.ico</Image>
<Url type="text/html" method="GET" template="http://translate.google.com/#en|pt|{searchTerms}">
</Url>
</SearchPlugin>

Here I am using Google Translate to always translate whatever text I put in the search box from english to portuguese. You can use it as a model for your own search plugins, it will fit most of the situations, as long as they use the GET method.

Me searching for the translation of "flotsam"


Now a look at each section:

<SearchPlugin
xmlns="http://www.mozilla.org/2006/browser/search/"
xmlns:os="http://a9.com/-/spec/opensearch/1.1/">
Here we define the namespaces for this XMLfile. Just put it always like this and it will work unless the format changes in the future.

<ShortName>Translate</ShortName>
<Description>Google Translate</Description>
<InputEncoding>UTF-8</InputEncoding>
Give a name to your search engine, inside the ShortName tag, a description inside Description and what encoding to use when entering the text to be searched inside InputEncoding. I recommend UTF-8 unless you are into some heavy characters stuff.

<Image width="16" height="16">http://translate.google.com/favicon.ico</Image>
This defines the icon to use with your search engine. Find the URL of the favicon and put it inside the Image tag and Firefox will automatically download the icon.

<Url type="text/html" method="GET" template="http://translate.google.com/#en|pt|{searchTerms}">
</Url>
</SearchPlugin>
This is the most important part of the file because it tells what the link is and where to put the your search terms. In the case of Google Translate there are the source language, destination language and search terms, all separated by a pipe (|). I have fixed the languages from "en" to "pt" and where the search terms should be I entered {searchTerms}, which will be parsed by Firefox and replaced by what I enter in Firefox's search box.

In order to create an Url tag for other search engine website, you should first make a few tries to see where the link changes (where your search terms are being written). When you find it, just replace the random search terms with {searchTerms}, copy the link and put it inside Url tag template attribute.

Well, we have created the XMLfile. Now we need to know where to put it:

On Windows, assuming it is installed on the C: drive, you should move the XML file to:
C:\Users\yourUsername\AppData\Roaming\Mozilla\Firefox\Profiles\<yourProfileID>.default\searchpluginsC:\Document and Settings\yourUsername\Application Data\Mozilla\Firefox\Profiles\<yourProfileID>.default\searchplugins (Windows XP/2000/2003)

On Linux, the same can be achieved by moving it to:
~/.mozilla/firefox/<yourProfileID>.default/searchplugins

On Mac OS, you can move it to one of these folders:
~/Library/Mozilla/Firefox/Profiles/<yourProfileID>.default\searchplugins
~/Library/Application Support/Firefox/Profiles/<yourProfileID>.default\searchplugins

If the directory searchplugins directory does not exist, feel free to create it.

Attention: If you later change the search plugin file and there are no changes in Firefox (even after restarting it), try to move the file away from the searchplugins directory and close Firefox (thus forcing it to sync everything). Then, before opening it again, move the file back to the searchplugins directory. I have witnessed this behaviour with Firefox 9.0.1 on Windows 7, but not on Arch Linux.

Be aware that the XMLfile I described in here isn't the actual OpenSearch format but rather a Firefox variant for locally stored OpenSearch plugins. However, mostly everything is the same and you can find more information at MDN.
Also, Firefox may change your XML file once it gets loaded and alter things like the favicon URL (replacing it with base64 encoded data, for caching).

OpenSearch is supported in Firefox 2.0 and all versions above.


This plugin is also available for direct download: Here.